Free Cloudflare-based dynamic DNS using your own domain
Posted
Contents
Introduction
Dynamic DNS services are a great way to access your self-hosted services while you are away from home. They can be used for anything from a VPN server to provide remote access to your home network, to a fully SSL-secured website for your personal shop or blog.
Most internet service providers (ISPs) will provide their customers with a dynamic public IP address that is subject to change without notice.
Many providers will allow customers to pay a premium for a static IP address that is guaranteed not to change. With IPv4 addresses being rapidly exhausted, this is usually used by larger customers with the funds and hosting requirements to justify it.
If you are fortunate enough to have a static IP address, linking it up to a domain name is as easy as creating the appropriate records on your DNS server and calling it a day. For the rest of us, this is where dynamic DNS services come into play.
Dynamic DNS providers use a client-side service (often run directly on the router) to update a DNS record whenever a change in public IP is detected. A few examples of free dynamic DNS services include:
These providers allow users to create a subdomain on one of their registered domains that will always point to their public IP address. Most of them also have some form of premium plan that allows for the use of a custom domain name.
This post aims to guide you through the process of creating your own dynamic DNS service using your own domain name, for no cost besides the registration and renewal of the domain name.
I have seen a few similar guides online, but few cater to those who are new to networking and self-hosting. Feel free to skip ahead to get to the good stuff.
Registering a domain
Go ahead and skip to the next section if you already own your own domain. You will need to be able to change your domain’s nameservers to be able to fully follow this guide.
When registering a domain, I recommend that you do it through a registrar that is not linked to your hosting provider. Most hosting providers these days offer domain-name registration services, but few will give you as much control over your domain as a dedicated registrar.
There are thousands of domain name registrars to choose from, but I’ve listed a few highly-rated sites below:
Personally, I have had good experiences with Namesilo. Their interface is slightly dated but they offer you full control, good support, and complete Whois privacy by default.
Cloudflare DNS
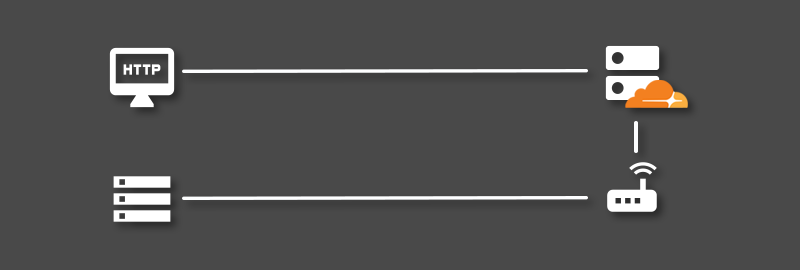
Now that we have a domain name, we need a way to point it somewhere meaningful. DNS Servers are responsible for managing and serving the records that point domain names to IP addresses and other domain names.
![]()
With over 10% of the world’s web traffic passing through their servers, Cloudflare is one of the most popular DNS providers on the web today. They offer proxy services for attack prevention on top of their regular DNS services. They also have a comprehensive free tier, which we will be using in this guide.
Creating an account
Head to the Cloudflare website and hit “Sign Up” to register. Follow the prompts and verify your email address.
Adding your website
Click the “Add site” button next to the account menu and support buttons.
You will be prompted to enter your site, simply enter the URL of the site that you registered previously and click “Add site”.
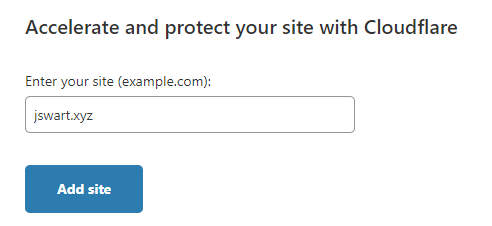
Select the free plan when prompted. The free plan caters to personal websites and blogs where basic DNS functionalty and protection is required.

Cloudflare will scan your site for DNS records and you will be asked to replace the nameservers on your domain with Cloudflare’s nameservers.
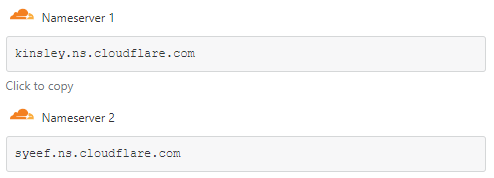
Log in to your registrar account and navigate to the domain management section. In my example this would be found on the NameSilo website. Locate your nameserver settings and adjust these to match the addresses provided by Cloudflare.
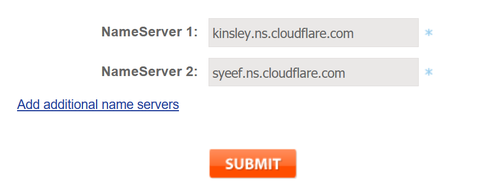
If Cloudflare does not detect your updated nameservers automatically, prompt a re-check using the “Re-check now” button.

Congratuations! Cloudflare is now responsible for routing traffic between your domain name and the IP addresses that you specify. Next, we will set up some DNS records and create some subdomains.
Setting up your records
There are plethora of DNS record types out there, but the most common are:
- A (Address) records - Points your domain to a certain IP address
- CNAME (Canonical Name) records - Redirects one domain to another
- MX (Mail Exchanger) records - Specifies how email is routed when sent to your domain
- TXT (Text) records - Stores information for other services, Let’s Encrypt is a good example
This post will only touch on A records and CNAME records, but you may want to follow your registrar’s guide on setting up your MX records if you would like to receive emails using addresses on your domain.
We will first be creating an A record that will be used to point a subdomain to your public IP address. Hit “Add record” and begin to fill in the following fields:
- Type - This is the record type, as discussed above, and should be set to “A”
- Name - The subdomain that you would like to use when you access your home network
- IPv4 address - The IP address that your chosen subdomain will point to
- TTL - This can be left on “Auto”. More info here
- Proxy status - Click on this to bypass the Cloudflare proxy, you should see a grey cloud
Feel free to fill in your public IP address if you know it, otherwise use a placeholder address (like 8.8.8.8) for now. We will be updating this dynamically soon.
Once complete, you should see something similar to the image below. Note that if you would like to use your root domain instead of a subdomain (yourdomain.com instead of subdomain.yourdomain.com) you can use “@” in the Name field.

Optionally, you can now create some CNAME records that can be used for different services on your home network. Feel free to skip ahead if you just want to update a single DNS record.
CNAME records are extremely useful when you are hosting a number of different services on your home network, and you would like to access them using different subdomains. For example, a typical self-hosted setup may have a set of records like the following:
- A record - home.yourdomain.com -> public IP address
- CNAME record - blog.yourdomain.com -> home.yourdomain.com
- CNAME record - portfolio.yourdomain.com -> home.yourdomain.com
- CNAME record - plex.yourdomain.com -> home.yourdomain.com
- CNAME record - wiki.yourdomain.com -> home.yourdomain.com
By pointing all of the different subdomains to the entry created for dynamic DNS, only a single record needs to be updated by the dynamic DNS client application. You can then use a reverse proxy service like NGINX or Traefik to route requests aimed at different subdomains to the correct services on your local network.
Now that we have the appropriate record on the DNS server pointing to a dummy IP address, we need to set up a dynamic DNS client to keep it up-to-date.
Updating DNS entries
While certain routers offer the ability to use a custom dynamic DNS service, mine does not. I am currently using the ddclient application as a way to keep my DNS records on Cloudflare up to date.
Dynamic DNS client applications such as ddclient will periodically check your public IP address for changes. If a change is found, they will use the API supplied by your DNS provider to update an A record of your choice.
The folks at LinuxServer maintain a Docker image for ddclient, which makes installation a breeze.
Create the docker-compose file
Grab the contents of the docker-compose file below and add it to your docker-compose.yml file.
Don’t forget to replace /path/to/your/ddclient/config with the location in which you would like your ddclient configuration stored.
---
version: "2"
services:
  ddclient:
    image: linuxserver/ddclient
    container_name: ddclient
    environment:
      - PUID=1000
      - PGID=1000
      - TZ=Europe/London
    volumes:
      - /path/to/your/ddclient/config:/config
    restart: unless-stopped
Run the container for the first time
Launch the container in detached mode using docker-compose up -d. This will generate a ddclient.conf file in the /config volume for you to edit.
Modify the ddclient config file
There are a few parameters in the configuration file that need to be modified.
Change the daemon=300 line to daemon=600 or greater. This is necessary if you want to make use of the checkip service provided by DynDNS to obtain your IP address.
Uncomment the #use=web, web=checkip.dyndns.org/, web-skip='IP Address' line by removing the # character. This will instruct ddclient to use checkip to obtain your public IP address.
Uncomment the block under ## CloudFlare (www.cloudflare.com) and change the following details:
zone- Your domain name, not including your chosen subdomainlogin- The email address that you use to log inpassword- Your global API key, found under “API Tokens” on your Cloudflare profile- Enter the full domain name(s) to keep updated on the line underneath the API token
See below for an example of this config block:
protocol=cloudflare,        \
zone=jswart.xyz,            \
ttl=1,                      \
login=email@email.com,      \
password=apitoken           \
home.jswart.xyz
Make sure everything works
Even though ddclient should be watching your configuration file for changes, you can restart it to be safe:
docker-compose stop ddclient
docker-compose up -d ddclient
Check back on your Cloudflare DNS records. The A record that you created and selected in the ddclient configuration file should now be pointing to your public IP address.
If there are any issues, check the ddclient logs using:
docker-compose logs -f ddclient
When everything is working, you should see a line similar to:
SUCCESS: home.jswart.xyz -- Updated Successfully to ...
The change to the DNS record will likely take a few minutes to propagate to other nameservers, but you should now be able to use your domain name to access your self-hosted services. You will still need to make sure that you have your ports correctly forwarded on your router.
Conclusions
Hopefully this post shows you setting up your own dynamic DNS service does not have to be a difficult task, and that keeping all of the components under your control can be a rewarding and educational experience while also saving you a few dollars.
Leave a message in the comments if this worked for you, if you have any questions, or if you would like some more information on a certain topic.